Monday 28 May 2012

TYPES OF HINGES
V. Ryan © 2002-2008

A large variety of hinges are available from most hardware stores. The type bought depends on how it is to used and what it is to be fitted to. For example, when selecting a hinge for a jewellery box, a small brass butt hinge is likely to be used rather than a concealed hinge. Furthermore, brass hinges are more expensive than steel ones and they give a quality look to the completed product. Below are some of the more popular hinges that are available.
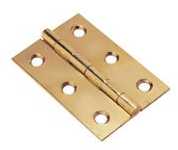
BUTT HINGE: Comes in a range of sizes from 13mm to 150mm and is normally used for cabinet doors. They are very strong but cannot be adjusted once they are fitted.
 
    
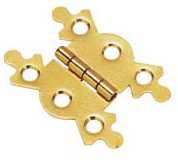
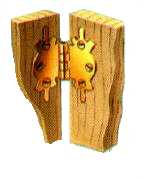
BUTTERFLY HINGE: This is often used on light-weight doors and different shapes and patterns are available. They are generally easy to fit.


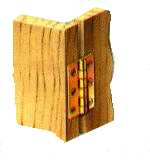
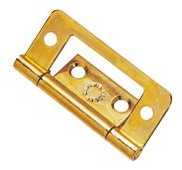
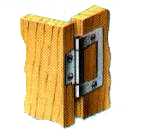
FLUSH HINGE: This type of hinge does not require a recess to be cut. They are not as strong as butt hinges but can be used for light-weight doors and small box construction.


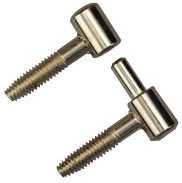
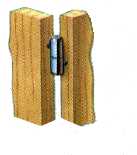
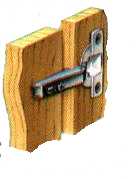
BARREL HINGE: This comes in two parts. The threaded part of the hinge is screwed into a pre-drilled hole. They are easy to fit and the hinge can be dismantled.


`
 
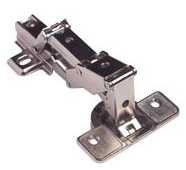
CONCEALED HINGE: These normally come in two sizes (25mm and 36mm. The hinge is adjustable once fitted and is designed with chipboard and MDF in mind.
    
CONTINUOUS or PIANO HINGE
    
 
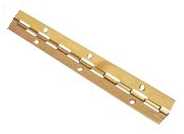
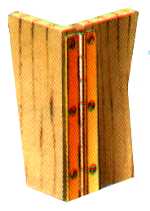
This is a hinge that comes in different lengths and can be bought in brass or steel. It is ideal where a long hinge is required such as a desk top or a cupboard door. Small countersink screws are normally used to fix it in position.

Friday 11 May 2012

Veneers

Wood Veneers


In woodworking, veneer refers to thin slices of wood, usually thinner than 3 mm (1/8 inch), that typically are glued onto core panels (typically, wood, particle board or medium-density fiberboard) to produce flat panels such as doors, tops and panels for cabinets, parquet floors and parts of furniture. They are also used in marquetry. Plywood consists of three or more layers of veneer, each glued with its grain at right angles to adjacent layers for strength. Veneer beading is a thin layer of decorative edging placed around objects, such as jewelry boxes. Veneer is also a type of manufactured board.
Veneer is obtained either by "peeling" the trunk of a tree or by slicing large rectangular blocks of wood known as flitches. The appearance of the grain and figure in wood comes from slicing through the growth rings of a tree and depends upon the angle at which the wood is sliced. There are three main types of veneer-making equipment used commercially:
  • A rotary lathe in which the wood is turned against a very sharp blade and peeled off in one continuous or semi-continuous roll. Rotary-cut veneer is mainly used for plywood, as the appearance is not desirable because the veneer is cut concentric to the growth rings.
  • A slicing machine in which the flitch or piece of log is raised and lowered against the blade and slices of the log are made. This yields veneer that looks like sawn pieces of wood, cut across the growth rings; such veneer is referred to as "crown cut".
  • A half-round lathe in which the log or piece of log can be turned and moved in such a way as to expose the most interesting parts of the grain.
Each slicing processes gives a very distinctive type of grain, depending upon the tree species. In any of the veneer-slicing methods, when the veneer is sliced, a distortion of the grain occurs. As it hits the wood, the knife blade creates a "loose" side where the cells have been opened up by the blade, and a "tight" side.
Historically veneers were also sawn, but this is more wasteful of wood. Veneering is an ancient art, dating back to the ancient Egyptians who used veneers on their furniture and sarcophagi.

Producing wood veneers
The finest and rarest logs are sent to companies that produce veneer. The advantage to this practice is twofold. First, it provides the most financial gain to the owner of the log. Secondly, and of more importance to the woodworker, it greatly expands the amount of usable wood. While a log used for solid lumber is cut into thick pieces, usually no thinner than 1 1/8 inches, veneers are cut as thin as 1/40 of an inch. Depending on the cutting process used by the veneer manufacturer, very little wood is wasted by the saw blade thickness, known as the saw kerf. Accordingly the yield of a rare grain pattern or wood type is greatly increased, in turn placing less stress on the resource. Some manufacturers even use a very wide knife to "slice off" the thin veneer pieces. In this way, none of the wood is wasted. The slices of veneer are always kept in the order in which they are cut from the log.

Types of veneers

There are a few types of veneers available and each serves a purpose.
  • A: Raw veneer has no backing on it and can be used with either side facing up. It is important to note that the two sides will appear different when a finish has been applied, due to the cell structure of the wood.
  • B: Paper backed veneer is as the name suggests, veneers that are backed with paper. The advantage to this is it is available in large sizes, or sheets, as smaller pieces are joined together prior to adding the backing. This is helpful for users that do not wish to join smaller pieces of raw veneers together. This is also helpful when veneering curves and columns as the veneer is less likely to crack.
  • C: Phenolic backed veneer is less common and is used for composite, or manmade wood veneers. Due to concern for the natural resource, this is becoming more popular. It too has the advantage of being available in sheets, and is also less likely to crack when being used on curves.
  • D: Laid up veneer is raw veneer that has been joined together to make larger pieces. The process is time-consuming and requires great care, but is not difficult and requires no expensive tools or machinery. Veneers can be ordered through some companies already laid up to any size, shape or design.

Patterns

There are a number of "patterns" common to veneered work. This refers to the way the veneers are laid up.
  • A: Book matched: where the veneers are opened from the flitch much like the pages of a book.
  • B: Slip matched: where the pieces are joined together in the order they come from the flitch, and have the same face kept up.
  • C: Radial matched: where the veneer is cut into wedge shaped pieces and joined together.
  • D: Diamond matched: where the pattern formed is diamond shaped.

Advantages of using veneers

Furniture made with wood veneer uses less wood than the same piece of furniture made with solid wood. Some projects built using wood veneer would not be possible to construct using solid lumber, owing to expansion and contraction caused by fluctuation of temperature and humidity.

Buying veneers

Wood veneers are typically sold by the square foot. With the ability to join veneers, even small pieces are usable, resulting in very little waste. Many sources sell small packets of veneers that are sequence matched and are ideal for small projects. These make experimenting and practicing much more economical. It is also possible to buy plywood and other substrates with veneered faces for larger projects consisting of casework.

Bench

what i worked on in vekterworks

Wednesday 9 May 2012

Lazy Bum

How Being A Lazy Bum Can Be A Good Thing

An artical i found online

Being called a “lazy bum” could mean you’re about to be fired from your job. Or your Dad is about to kick you out of the house. Or your wife is packing up the kids and going to her mother’s.
It’s not a good thing to be a lazy bum.
Well, unless you’re choosy about when and where you’re lazy.
About 10 years ago I was the new guy in a high-tech company in the Seattle area and I was given the “grunt work” that nobody else wanted to do. I’ll spare you the details, but every time I had to do that specific task it took about four hours of copy and pasting, typing in data, etc. Zzzzzzzz!
I absolutely hate work that’s brain dead so one day instead of spending 4 hours in hell, I spent four hours writing a simple little tool that would automate the process. It wasn’t pretty, it wasn’t “commercial quality,” but it did the job.
And it did it in less than 15 minutes almost entirely hands-off!
Even though as a programmer I had used libraries and code snippets in the past to shorten development, that was the first real “Ah-hah!” moment where I saw what an automated tool could do for me. And that turned me into an “automation fool.” Whether it was using macros, coding stand-alone utilities, or even just finding ways to streamline a complicated process, I found “working lazy” could really pay off.
If you’re a hobbyist programmer maybe going the long way around isn’t such a big deal. But if you’re a professional coder you rely on getting a product out the door if you want to pay the bills (whether working as an emplotee or as an indie developer). Any way you can cut down the non-creative work, the better off you’ll be.
I sat down once and spent two days writing a utility that saved me 30-45 minutes. Doesn’t sound like a very good trade-off, does it? Except the task it automated is something I do at the beginning of almost every project. I’ve used it dozens of times so far and as long as I’m a developer I’ll continue to use it.
Plus, besides saving me time, it gets the drudge work out of the way so I can just dive in at the beginning of a new project with a positive perspective — not dreading the “housekeeping” I have to get out of the way before I can get to the fun stuff.
There’s brainless work in just about every project, but don’t let it slow down your progress. Find a way to automate it and let the computer take care of those tasks while you focus on the more creative parts of programming.
It’s one of the best ways to increase your “return on investment” as a programmer.

Tuesday 1 May 2012

Joints

JOINTS


Butt joints


Butt joint: Picture © L Riphagen 2006 Butt joints are the easiest of all to make. Wood is butted face to edge or end to edge and nailed, screwed or dowelled together. End to edge joints can be joined with corrugated fasteners.

Strength can be added by glueing the joining faces. These joints are not recommended for hardwood unless pilot holes and screws or dowels are used to hold them together.

When nailing or srewing but joints use corner or mitre clamps to hold the two pieces in place.


Butt joint on edge: Picture © L Riphagen 2006 End to edge butt joint.


Half angled or lap joint: Picture © L Riphagen 2006 Halved joints or lap joints are mostly used to assemble light frames which are going to be covered with hardboard or plywood. Half the thickness of each piece of wood to be joined is cut away with a tenon saw and the joint is glued and screwed or nailed. Halved lap joints are also used to join long lengths of timber as for fencing.

Half tee joint: Picture © L Riphagen 2006 Tee half joint


Mitre joint: Picture © L Riphagen 2006 Mitre joints are always cut to 45° in a mitre box so that they will form a 90° corner when joined. As no end wood is ever seen these are very neat joints but they are weak. Normally used for picture frames where they are nailed with panel pins. When used for other purposes they must be strengthened with glue blocks, angle braces or loose tongues. Mitre joints should always be glued.
Mitre joints

Lap or halved joints


Nailing mitre joint: Picture © L Riphagen 2006 When nailing a mitre joint always start the nail with one part of the mitre above the other. The nails will pull the mitre into square.


Through rebate joint: Picture © L Riphagen 2006 Rebate joints are suitable for joining top and bottom ends of furniture. Stopped rebate joints hide the joint. Glue and skew nail, or screw the joint together.


Stopped rebate joint: Picture © L Riphagen 2006
Stopped rebate joint


Through housed joint: Picture © L Riphagen 2006 Housed joints are mostly used for shelves. The stopped house joint hides the actual joining. Use skew nails or screws to fasten the boards together.


Stopped housed joint: Picture © L Riphagen 2006 Stopped housed joint


Flat loose tongue and groove joint: Picture © L Riphagen 2006 Loose tongued joints are used to join planks edge to edge to form a larger board like a table top in which case they are always glued only.


Tongue and groove joint: Picture © L Riphagen 2006 Bare faced tongue and groove or Loose tongue and groove joints can be used to join chair rails to chair legs. Note the glue blocks for extra strength.


Mortise and tenon joint: Picture © L Riphagen 2006 Tenon and mortise joints are very strong joints mostly used in furniture making and for heavy doors and gates. They are not easy joints to make. The secret in making a good tenon joint lies in careful and accurate marking.The tenon’s width should not be less than a third of the thickness of the wood especially if wood of the same thickness is joined. The shoulders may be of any width and may also be offset when the mortise is made in rebated wood. Make the mortise before rebating the wood. If the top of the mortised wood is to be in line with the edge of the tenoned wood a haunched tenon can be made with the haunch cut back to be in line with the shoulders.

Haunched tenon: Picture © L Riphagen 2006 Haunched tenon joint


Bevelled haunched tenon: Picture © L Riphagen 2006 Beveled haunched tenon


Marking mortise and tenon joints: Picture © L Riphagen 2006 Marking and making mortise and tenon joints.


  1. Mark the depth of the tenon on both edges and faces of one of the pieces of wood.
  2. Set the pins of the mortise gauge to the width of the tenon and set the block to the width of one shoulder. Mark the tenon on the edges and end of the wood.
  3. Using the same settings of the mortise gauge mark the mortise on one side of the other piece of wood.
  4. Set the marking gauge to the centre of the mortise and mark a centre line.
  5. When making a blind tenon drill holes (with a diameter slightly smaller than the width of the tenon) closely together along the centre line at a depth slightly more than the length of the tenon to create an escape route for excess air and glue. A 1 mm (or smaller) hole can be drilled from the side into the base of the mortise for the same purpose. This hole can easily and unobtrusively be filled with wood filler or beeswax if necessary. When making a through tenon it is best to mark the tenon on both sides of the wood and to drill from both sides or to watch and “back drill” to avoid splintering the wood.
  6. Remove excess wood with a sharp chisel, always working from the centre to the edges of the mortise. Keep edges of the tenon and mortise as sharp as possible.
  7. Place the wood from which the tenon has to be cut at a 45° angle in a vice and with a tenon saw start cutting the tenon cheeks at the highest point on the waste side of the marking. When the depth line of the tenon is reached, turn the wood around and finish cutting from the other side. Then cut the shoulders and lastly the haunch. Remove excess wood with a sharp chisel till the tenon fits tightly in the mortise.
  8. Glue the two parts together.
  9. A dowel or screw inserted from the side may be used to strengthen the join.
  10. A through mortise can be strengthened by inserting small wedges in the opposite end of the wood to hold the tenon in place.
Marking mortise joint: Picture © L Riphagen 2006 Marking a mortise


Bridle joint or Open mortise and tenon: Picture © L Riphagen 2006 Bridle joints or open mortise and tenon joints are used in furniture making especially to join the legs to the cross pieces. Marked in the same way as mortise and tenon joints the only difference is that the mortise is cut into the wood from the end.


Dovetail joint: Picture © L Riphagen 2006 Dovetail joints are very strong and neat joints used primarily to make drawers and boxes. It needs a lot of practice to make a good dovetail joint.


Marking dovetail joint: Picture © L Riphagen 2006


Marking for dovetail joints.
  1. Square the ends of the wood to be dovetailed.
  2. Set the sliding bevel to a suitable pitch of between 1 in 6 for heavy work and 1 in 8 for smaller and more detailed work. Avoid sharp angles as the points of tails break easily.
  3. Scribe the tails on the end and face of the wood and mark the “waste” pieces.
  4. Clamp the wood in a vice and cut on the waste side with a tenon saw.
  5. Lay the two pieces over each other and transfer the markings through the cuts with a tenon saw.
  6. Remove the waste between tails and pins with a chisel.
Lapped dovetails are mostly used for drawer fronts as they give a very neat, strong joint with only one side showing end wood. Marking is the same as for open dovetails but the cutting out between the pins needs a fair amount of chiseling. Special dovetailing bits are available for routers, which are ideal for this job.

Running dovetails

Running dovetail joint: Picture © L Riphagen 2011 A very nice joint to use for fixing drawer sides to fronts but don't attempt it without a router.


Dowel: Picture © L Riphagen 2006 Dowels are mostly used to strengthen butt, mitre and rebated joints but are also used to join wood when making or repairing small tables, chairs and doors. When joining wood to be rebated or grooved, drill the holes for dowels first. The diameter of a dowel should not be more than a third of the width of the narrowest wood to be joined. Cut the necessary length from dowel sticks and lightly chamfer the ends. Good dowel sticks have a “V” groove along the length to allow excess glue and air to escape. If your dowels do not have this groove you can run one in by using a marking or mortise gauge. Alternatively you can allow a little space at the end of the hole in which the dowel is inserted to allow for the extra glue and air but this will weaken the joint.

When using dowels to join cross pieces to small legs, stagger the dowels for maximum length and strength.

Glue blocks: Picture © L Riphagen 2006 Glue blocks.
Small pieces of quadrant or a length of quadrant run the entire length of the joint make excellent glue blocks and give a neat finish especially on the inside of drawers and boxes.


Angle brace: Picture © L Riphagen 2006 Angle braces are always glued and screwed or nailed


Strengthening joints

Dovetail joints

Tenon and mortise joints

Tongue and groove joints

Housed joints

Rebate joints

Wednesday 25 April 2012

Starting off

An image i found online and thought ith would go well for my first ever blog for my blog.